"When our eyes see our hands doing the works of out hearts, the circle of creation is completed inside us, the doors of our soul flies open and love steps forth to heal everything in signt"

-- Michael Bridge

Monday, December 27, 2010

A non-holiday card ;)

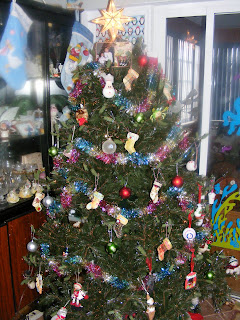
Hello there! I hope everyone had a Merry Christmas/Happy Holiday! Mine was nice. So sweet to see my babies enjoy the magic of Christmas. Christian had a blast & loved everythign he got, and Alivia was just precious!! This is her forst "real" Christmas...where she knows whats going on and opened her own presents. The excitement was just infectious! Here is a picture of our tree Christmas morning before the kids got up. When they came downstairs and saw that signt... squeels of excitement, I tell you!

It was really nice.

Ok, but, I'm sorry, thank God it's over! I'm sorry, I love you Jesus and I love Christmas and everything, but I need peace that this holiday season did not bing me (I know, it's totally my fault I'm sure - I took way too much on and with my mom being sick, work being stressful, and having two little ones to care for, well...STRESSFUL anyone?!?!?

OOOOOOh... I did get a bunch of awesome craft goodies for Christmas!! My hubby got me a Slice!! Super excited to play with that - but I haven't, just yet :(. I also got two Lawn Fawn Stamp sets (Just my Type and Petite Florals) along with a few Hero Arts Stamp sets from the office - THANK YOU {not so} SECRET SANTA!!!

On Christmas Eve I played around with my Hero Arts stamps & Copics and made this sweet little friendly card: I used Neenah Kraft paper as the card base and Basic Grey Origins patterned paper. I stamped the images onto plain White DCWV paper and colored them with Copics. So, I tried my hand at blending, mainly on the cactus & flowers, and really like how they came out. I'm getting better, but am in NO WAY an expert. I finished it off by stamping the sentiment from the set ("HOWDY") onto the EK Success Real Estate punch and adding a twine "lasso" to finish off the card. I popped up the cactus and sentiment with foamies for extra pretty ;).

Well, I hope you have a great day and the holiday craziness is over for you too!!!

Tuesday, December 21, 2010

My Mamma's Christmas Present!!!!

Hey there crafty girls!! Ok... I'm feeling better. Last week, was a rough one, but I took a few much needed days off work (Wed., Thurs., Fri. & yesterday) and finished up all all of my holiday preparations and went with the family to Orlando. It was a nice trip. I was feeling pretty crappy the whole time, but I forced myself to not be the Grinch. I’m not sure I fully succeeded, but I did try.

Anyway! Last night, I finally finished my mom’s (crafty) Christmas gift. The only things she asked for were a really nice knife set & new frying pans (I got her both). The only other thing she said she wanted was a stamp holder like what I made for my Lawn Fawn Stamps. She just recently started paper crafting, and had joined the CK Club and a card of the month club. She’s having fun with it, and also has started a little (clear) stamp collection. Besides this, I also got her inks, mini (6X6) paper stacks, and a Fiscars Stamp Press (so that I wouldn't have to get her a bunch of clear acrylic blocks).

Sooooo.... for her stampy home, I decided on an clear album (an arrow) by Clear Snap. I traced/cut a bunch pages from plain ol’ chipboard to alternate them with the clear pages and decided to make it a combination “stamp holder/mini scrapbook” for my mom. {I used all new pics. - that I haven’t even given her copies of yet - so she should be pretty excited about that ;).} Then I went to town decorating with October Afternoon’s Modern Homemaker papers/letter stickers/badges/Mini Market stickers/element stickers. Siiiiiigh... when I saw this line, I just knew it was perfect for this project for my mom! Ok, so, what I'm mainly sharing is the scrappy pages, but remember, inbetween each scrappy page is a clear page to house her clear stamps :D. Here’s a first look!
I’m actually hyperverbal (self-diagnosed...) So that’s the explanation on the loooong title of the book: “LOOK! It’s Kathy’s stamper keeper & creative inspiration” ;) OOOOOOH WELL! I made the flower on the over by making 3" by ½" & 2" by ½" strips of paper and layered them around a punched (Martha Stewart) scalloped circle, gluing them with Glossy Accents and finished it off with a Badge. The other side of this page can house stamps. I love that you can see my hubbys surprised face popping through the cover ;). I wanted this to be encouraging and uplifting...and fun for her, so, each page has a “theme” that I wrote out with the letter stickers in the set. Like, this one is “PLAY”. I made the book before I had the pictures and then tried to print pics according to the page’s theme. In case you can’t read it, the sticker on this page says “Mom, I hope you have fun getting crafty! Remember, creativity heals! Love, Heather”:
This next page is her boyfriend, Mike and his kids on Thanksgiving: I HAD to use this stamp!!!! I've been dying to use it since I got it, but haven't had much opportunity. I got it in a Studio Calico kit (that I got, basically, JUST for the stamp!!!) And thought it was perfect for the “BE SILLY” page: This one I had already labeled “BE STRONG” and when I saw this picture of my son jumping into her pool it made me LAUGH OUT LOUD, and thought it was perfect!! Then this is a look how the pages will look with stamps on them! That’s right, I got my mom her 1st Lawn Fawn stamp set to include in the book. It’s one of the newest sets “Hello Friend”. I thought it’s be perfect!! My only mistake is not ordering a set for myself :(: This is my Mike, Paige (my niece, whom my mom is raising), and my mom herself! This was actually their Christmas photo, came out really nice: This, of course, is my babies ;): For this page, which I had already titled it "LIVE & CREATE", so, how perfect was it that I had just taken these pics of the kids and my mom making Christmas ornaments, from last weekend!! This is the last scrappy page. Titled “U.R. LOVED” with a pic of my mom & my sweet little Lulu.
This back (inside) page is actually a clear page. I covered the back (actually the back cover) with paper. As you can (kinda) see, I added a set of American Crafts alpha/number stamps: This is how I decorated the back of the book. I just COULDN’T NOT use that clothesline!! In the end, I finished it off with various ribbons and just love how it came out!

Well, that’s my share (probably for the week). I hope it makes you smile! I feel so happy to have completed it and think she will love it! God bless you all and your families this Christmas.

Monday, December 13, 2010

Teachers' Christmas Gifts

I started preparing for my kids' teachers' gifts last year! Yep, last year. I saw this neat thing out here in blogland (somewhere, sorry!) to make magnets using bottlecaps! So, I started saving beer bottle caps a little uner a year ago. Yea, and this took me quite a while because #1, I we don't drink a lot of beer and #2 the caps couldn't be TOO bent. Twist off caps are ideal, but, when we buy beer, we like variety, so we have all different kinds of caps (Yingling, Blue Moon, Heinekin, Pesidente, Corona, etc.) Thinking back, I should've just stuck with the same beer all year - would've made things A LOT easier - but less interesting...oh well!

Anyway, here's a look at the few different varieties of gifts I made:


I made 5 of these in total (all different). Two of them were recyclables from Maya Road. These are tins I bought Maya Road goodies in and then saved...for the right project...hello right project!! I love recycled projects. Makes me feel like I'm doing something good while I'm...doing something good ;). The other three tins were purchased from Joanne Fabrics (at 60% off - way cheap!!). So anyway, I covered all these tins in October Afternoon's Schoolhouse and Report Card papers/letter stickers/element stickers.

For the magnets, I punched 1" (fit perfectly!!) circles out of Halloween, Easter, Christmas, and Valentines Day themed paper and then glued them into the bottle cap, using Glossy Accents glue. This helped the papers not to lift when I added the resin - trust me, there were many that did not make the final cut (trial & error what can I say)! I got the Resin from Michaels (over in the glue section) but Glossy Accents would have worked perfectly. Buuuuut I don't like to waste my Glossy Accents. I started out using it, and half a bottle was gone in NO TIME!! The resin was $20.00 - but i used a 40% off coupon - and you can get A LOT more use out of that stuff!! In the end the resin was much more cost effective AND I really like how it came out better than using the Glossy Accents - believe it or not.

Well, that's my share for the day.

Geeze - does anyone else feel completely overwhelmed with their “to do” list this holiday season?!? Yesterday’s sermon in church was about just this kind of thing - doing too much and missing the Spirit of Christmas!! But, I mean, between Christmas Cards (mine are made, but not addressed or written out yet!), teachers/family/friends gifts (all of which I’m in the middle of - well, at least the teachers are officially checked off the list!!), both of my kids have their class parties this week, our Bible Study Group’s party is Wednesday (I have to make guacamole and 4 scrapbooky gifts just for that - just printed the pics!!), wrapping gifts, and I have 4 dozen cookies to bake by Wednesday too. It's a lot to do!

Then, on top of all of that, I was hit on my way home from work 3 weeks ago & left feeling absolutely like crap!!! Nonstop headache for 3 weeks straight!!!! My doctor prescribed meds. and I’m going to the Chiropractor for massage therapy (MRI soon). So, this weekend, out of nowhere, I’ve started having an allergic reaction to the meds (hives, red - itchy rash on my hands that are sensitive to the touch - THEY’RE MY HANDS - all I do is touch...and, oddly enough, my tongue hurts!!!). I stopped the meds. Thursday night....and I can't get to the doctor until Wednesday! ANNNND, just in case I haven't convinced you that my plate is full enough...Sal & I are taking the kids (helping chaperone their youth group The Marines for God) up to Orlando for the weekend, to the Holy Land Experience. I think God’s trying to force me to slow down... but these things are NOT going to do themselves. Today may be my only post of the week - and I’ll share more next week...we’ll see how it goes. Sorry to wine like a baby!! Hope you have a great week.

Thursday, December 9, 2010

My Son's Box O' Goodies

I actually snuck the trinket/goodie box I made for my son out to share with you today ;). Sheesh, WHAT DOES HE THINK I'M GOING TO DO WITH IT, FOR GOODNESS SAKE?!?! Anyway, he collects just about everything! If he sees a marble somewhere...a little leaf, beads, wood chips!! YOU NAME IT! So I though of the idea for the box... as a nifty little place to put all of his little finds (where my sweet little Alivia - who puts EVERYTHING in her mouth - couldn't get to them!).

I made it for him the day of the Bargain Hunt (I had to do something crafty while I was there, right). Anyway, this was supposed to be a Christmas present for him, but my husband showed up with the kids (for moral support - sweet boy that he is) while I was making it, and the little guy caught me!! So, I used another $3.00 wooden box from Michaels (a little different from the box I made for my niece)and covered it in October Afternoon's Schoolhouse papers, stickers, letters and even a badge a-top of a homemade flower. I forgot to tell you last time, the glue I use for these (wooden & paper) projects is the Elmers Craft Glue. It's like $6.99 at Michaels for a good sized bottle & works really well! I use it for alot of my projects using Chipboard & paper. I really like - second to Glossy Accents ;).

On the inside of the box, after covering it with more Schoolhouse papers, I made that little paper pocket using my Martha Stewart Scoring Pad. Super easy & I think it's a great addition. He loves to keep his Pokemon & Bakugan cards in there for safe storing - if you don't know what those are...don't ask... just know that you're lucky ;)!

I had intended to cover all of the sides (outside) with patterned paper, like I did with my niece's box, but only got two done and the other two remail bare (just wood) because Christiam loved it so much he stole it that very day and hasn't let me touch it since. I brought it to work with me today and took pics of it with what's in it today (of course, it changes almost daily). I had to laugh when I opened it. There are some marbles, a bead, a few Bakugan Cards (in the pocket), a Kooky Pen, some markers, a little Lego Star Wars guy, and the fibers off of my most recent Lawn Fawn Purchase (and I told him he COULD NOT have those, oh well...). Made me smile.
My sweet/crazy little 5 1/2 year old. Love that little guy! Makes me smile every day (and want to rip my hair out every other day). And you know what, I wouldn't have him any other way!! Thanks for peeking, have a great weekend everyone!

Wednesday, December 8, 2010

Putting those stocking ornaments to GOOD use!

Good morning ;). Thanks so much for all the love on my Box O’ Fun post!! It really means alot to me!

I meant to bring my son’s box today to take photos and share on the blog... but he got all nervous when he saw me packing it up “MOMMY, WHY DO YOU NEED MY BOX AT WORK???”. So I’ll try again tomorrow... and be sneakier this time.

I did have something to share today though, remember the mini stocking ornaments I made for my mom? Well, she had my kiddies over this weekend to decorate her tree and hung them all up. Here’s a picture of her finished tree. Came out SUPER cute if you ask me! Next year, I’m totally making more of these as gifts!!
Another picture to share, this is my mom and my 9 year old niece, Paige. Paige lives with my mom (mentioned that on here before). Obviously the pic of Paige & my mom was taken before the decorating began ;). Lookin good ladies! MUAH!
Well, that’s all I have to share for today. Thanks for peeking at my blog!! I love getting inspiration out here in blog-land, and love it that maybe, once in a while, I inspire one of you AWESOME ladies as well!! Have a fabulous day!!

Tuesday, December 7, 2010

Box O' Fun!!

Good Tuesday everyone!! I've been working like...kinda crazy... making Christmas gifts over here!! Today I'm sharing something I made for my 10 yr old niece, Shannon. She was just down for Thanksgiving (from NYC) and saw this little wooden box that I made (well, decorated w/ paper) for my son. She loved it (sorry haven't shared pics yet). So anyway, I before she left, I asked her what she wanted for Christmas this year, and said she wanted one of those "super cool boxes" just for her, and some Ugly Doll Keychains.

Amazon hooked me up with the Ugly Dolls and I went to Michaels and spent all of $3.00 on a little wooden box...and went to town decorating it! I was going to paint the edges of the box, but in the end I decided not to. I like how it came out without the paint. I covered the entire thing, inside and out, in variations of Cosmo Cricket's "Togetherness" paper and chipboard accents, the letters are also Cosmo, (I have to say, I just LOOOOVE these chip letters!!!). I also added some pearls & pearly brads for bling (Keiser Crafts, American Crafts, & Making memories), and an American Crafts Badge. I'm so happy with how it turned out. I've been waiting to use the Togetherness line for SO long!! I called it "Shannon's Goodie Box" ;), and I absolutely love everything about it!

I thought it was all perfectly complete and ready to ship, UNTIIIIIL I got my newest Lawn Fawn Stamps "My Silly Valentine" in the mail yesterday!!! I decided Shannon NEEDED some little note cards of her very own ;). The images AND sentiments in this set are so sweet I literally think I'm getting a toothache!!!!

I used Momento Ink to stamp them, Copics to make them purty, and Colorbox Chalks for extra pretty (both the Kraft/White paper are from Neenah)!! Inside, I used a heart from Lawn Fawn's Sophie's Sentiments Set and Lawn Fawn's Jessie's ABCs Set to Stamp her name. Little personalized notes wrapped in bakers twine from the Twinery ;) - I think that finished it off perfectly.


Well, I hope you all have a great day!!

Thursday, December 2, 2010

Its ornament time!!!

Morning!! Today I wanted to share a spin off of my (Scrapbooks Etc.) paper stocking adventure.

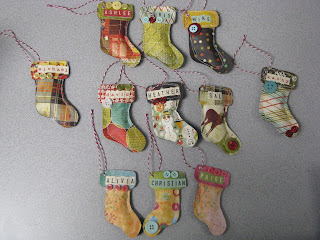
Ok, back story. My mom has a boyfriend, Mike. They're been together almost 3 years now and live together. Mike has 3 kids of his own. Their 1st Christmas living together. which was 2 years ago, they started a "tradition" that the kids all get them ornaments for Christmas for "their" tree. Cool idea, last year we got them some pretty cool ornaments too ;)... Well, I was so inspired by those little stockings, that I decided to make a set for my mom. It includes mini stockings for my mom, mike, his 3 kids (Michael, Chris, and Ashlee) for my brother, my hubby, and myself. Then I shrunk the template just a teensy bit and made one for my son, daughter, and niece (I didn't make one for my sister - sorry, but when you leave your daughter and never come back, except through random facebook comments, you're not getting an ornament on my momma's tree).


I used the Basic Grey's Jovial paper again, October Afternoon Mini Market letter stickers, bakers twine form The Twinery, and Papertrey Ink buttons. I love them, oh, how I love them. My mom LOVED them too - which is what's MOST important!!

I have another little share. My friend Danna and her hubby Justin, who are both in the Navy and stationed in Virginia (although he is currently serving overseas), have a sweet little baby boy named Harper Phoenix (he's 5 months old - YOU KNOW HE'S GUNNA BE A COOL KID WITH A NAME LIKE THAT!!). Anyway, this will be his 1st Christmas and they'll be spending it without Justin :(. Anywho, I made them an Christmas ornament for their family using recycled Bo Bunny button/bling packaging, a page from a (house) chipboard book ($1 from Michaels), October Afternoon paper, Hero Arts (owl) Stamps, Copics, and Martha Stewart glitter. So this is their "Family of Three- 1st Christmas" ornament that I made them ;).


Thanks for peeking!! Have a great weekend.

Wednesday, December 1, 2010

My Christmas cards are OFFICIALLY done!!!

Good Wednesday ;).

YAY!!! I've finally gotten the perfect Christmas card picture of my babies, and last night I finally finished my Christmas Cards. So, are you ready for my big reveal?!?

First, this is last year’s Christmas Card (purchased from Costco - which is where I have always gotten my Christmas Cards from):
Last year, I included my niece Paige in our cards because she wanted to be in it, and I try to never make her feel left out, but this year she opted out of ours. She, my mom, and my mom’s boyfriend Mike are sending their own Christmas photo cards.

And thiiiis is this year’s Christmas Card:


I made 47 total. They are all different, but the same. Same design/layout, different paper piecing patterns. I am absolutely THRILLED with how they came out!!! I paper pieced my fingers off with Lawn Fawn’s Cozy Christmas Stamp Set and Basic Grey’s Jovial paper. It was hard, long (I feel a Michael Scott’s “That’s what she said” joke coming on...), tedious - FUN - work, and to see them finally finished just makes me feel so satisfied (wow, I’m only getting worse)!!

I’ve seen some amazing cards here out in blog land, and I’m definitely not trying to say mine is better than anyones’, but this is literally the best card I’ve ever made. I haven’t seen any out there like this either (with the photo card). I feel mighty proud of myself. Mainly, because I wanted to quit so many times while I was cutting and assembling, but now.... pure peace & bliss. I. Am. In. Love.

Here’s some general instructions:

1. Cut Cardstock (in my case, Bazzil Kraft) 7 ½ by 6
2. Ink edges of card with Distress Ink - using ink blending tool
3. Cut Patterned Paper to 3 ½ by 5 3/4 and adhere to card base leaving a 1/8 edge
4. Choose your stamping/paper piecing pattern and GO TO TOWN stamping/paper piecing
5. Cut a 4 by 6 Picture to 3 3/4 by 5 3/4 and adhere to card base in remaining space

For mine I also heat embossed “HO HO HO!” using American Crafts White Embossing Powder in the fireplace, added Red Stickles to properly “hang” the stockings, and added bakers twine (from The Twinery) to the Merry Christmas Banner (from Lawn Fawn’s Bannerific Stamp Set) for extra pretty ;). I had lots of good OCD fun making these. Cozy Christmas is by far my most favoritest (yes, I make up words, occasionally) Christmas stamp ever!!!!! All those smiley little guys!!

Thanks for peeking. Happy Hump Day!